General navigation

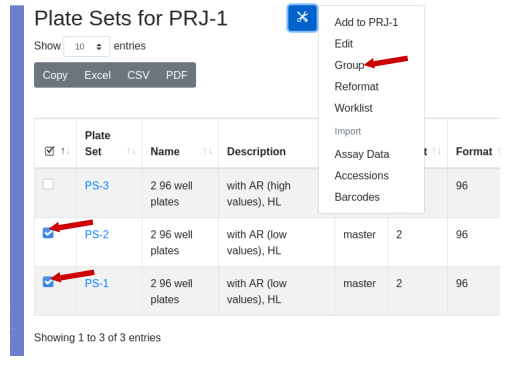
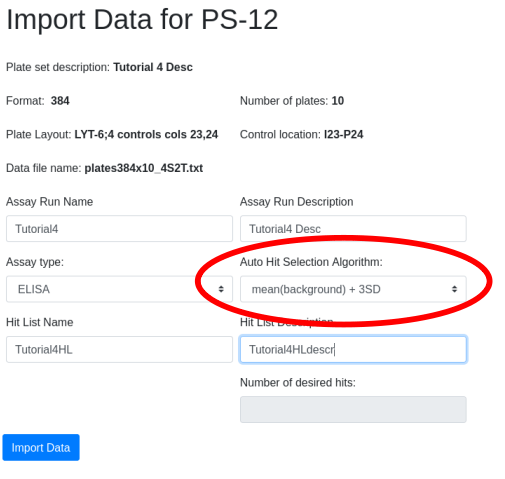
LIMS*Nucleus works with a nested heirarchy of entities. The object heirarchy can be navigted by clicking hyperlinks in the data tables. The left hand menu items allow for global navigation. Since users are often concerned with only one project at a time, LIMS*Nucleus tracks the current (default) project, which is visbile in the menu area. The default project can be changed by listing all project (first menu item) and clicking into a project. The tools icon presents workflows associated with the visible entity, and often require selection of row(s) in the data table.

Plate

Plates are one of three formats - 96, 384, or 1536 well The plate system name in the format PLT-NNN is automatically assigned at creation All plates are part of plate sets

Plates can be assigned a variety of types. Depending on the type, a plate may not contain samples. For example, assay plates are transient and discarded after data collection, so could not serve as the source for rearraying or replica plating.

Installed types are:

Type Description Contain samples?
assay contain associated data no
rearray created during a reformat operation yes
archive designated for storage yes
master original plate of samples yes
daughter result of replica plating or grouping operations yes
replicate result of replica plating yes

Plates are of various types - assay, rearray, glycerol, etc. Plate types are to provide clarity to the user - no convention is enforced

Replot

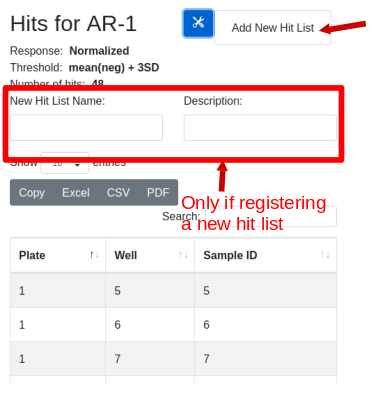
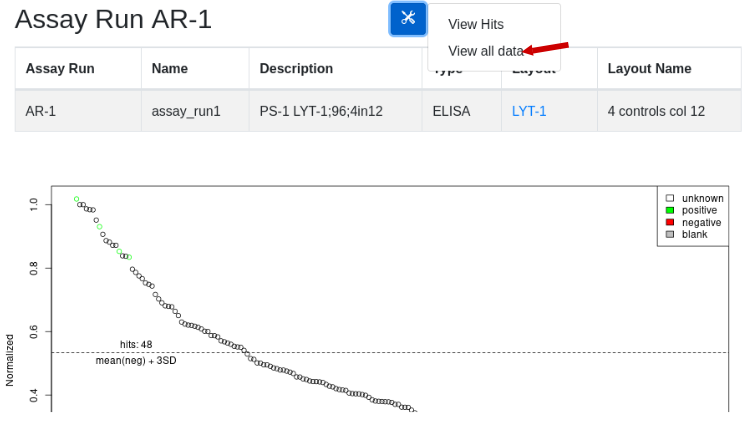
In the plot view you are given the option to replot data using different normalizations and thresholds. In any view hits are calculated based on the selected parameters. These hits can be viewed by selecting the tool icon ‘View Hits’ option. In the hits view a hit list can be registered. The ‘View All Data’ option provides a table of all the underlying annotated data for export. External software can then be used to analyze the data and generate hit lists:

Worklist

When a rearray workflow is executed, automatically a robot worklist suitable for executing the physical rearraying of samples is generated. That worklist is stored, and its existance is indicated in the “Worklist” column in the Plate Set view. With the plate set containing a worklist of interest selected, under the tools icon select the menu item ‘worklist’:

The worklist will be displayed. Use the export buttons to select the desired export format:

The worklist will be generated and transferred to your spreadsheet application:

Simplifying Assumptions

  • Always use the 3 character well name A01, not A1

  • Default to tab delimitted text In some cases comma or tab delimitted will be offered as an option. Proprietary formats are avoided.

  • Plates are always filled by column Well number is derived from the order of filling.

*Reformatting is performed in the “Z” pattern Quadrants are numbered in the Z pattern.

  • Plate sets contain plates of the same format and layout

  • Always import a full plate of data, even if the plate isn’t full e.g. a data file for three 384 well plates should have 3*384=1152 rows even if the third plate isn’t full. Only control wells and unknown wells with samples will be processed.

Tutorial 3, target layout definition

In tutorial4 we will run through the canonical workflow using duplicate targets. We could use the built in defaults target1, target2 etc., but we will assume you have a companion database that holds target specific information, and we wish to merge our assay data with the target information.

Assume we are screening transferrin receptor (CD71) antibodies against the receptor and a negative control - BSA. First we need to register the targets in our system. Use the target import file defined here. Select the menu item Targets/All Targets, (Note: if you are using the cloud demo database these targets have already been imported for you.) and select the ‘Bulk Target Upload’ option under the tools menu. Indicate the location of the downloaded targets.txt and import. The targets are now registered within project 10 and available in the targets dropdown.

Navigate into project 10 and select Targets/All Target Layouts. Select ‘Add Target Layout’ under the tools menu. Fill in Name and description and select Replication = 2. Select huCD71 for quads 1,3 (noting that target duplicates are always in the same column, sample duplicates in the same row). Select BSA for quads 2,4.

The layout will now be available during plate set creation or reformating within project 10:

Note that “TLY-4”” is only available in project 10 and only when target layout is set to “2”, which is only available when sample replication is set to 2 or 4.

Tutorial 4 will use this target layout with a new plate set created by reformatting.

Import Accession IDs

Accession IDs are imported by plate number/well number. The files page provides details on the file format, with a 2 plate sample file available. Navigate into the project of interest and select the plate set of interest. From the tool icon select Accessions under import:

A standard file import form will open - find the file and click submit. The number of lines expected will be calculated by querying the sample id count for the plate set. For example a plate set of two 96 well plates with 4 control wells per plate (no sample ids for controls) will require 2x(96-4)=184 accession ids. The control wells should not be included in the import file. For example a portion of the accession import file looks like:

1
2
3
4
5
6
7
8
9
10
11
12
13
14
15
16
17
18
19
20
21
22

plate well accs.id
1 1 AMRVK5473H
1 2 KMNCX9294W
1 3 EHRXZ2102Z
1 4 COZHR7852Q
.
.
.
1 89 BKLUY4714F
1 90 VHDTN3829S
1 91 XUTEZ7832G
1 92 EGTKM4119P
2 1 GWGJT9769W
2 2 TKSUP0061X
2 3 HLVOR2656F
2 4 TIYAO0501Y
2 5 YBBDN6102H
.
.
.

Once imported, accesion ids will appear in the well table:

Example accession ID import files:

File name Description
accs96x2controls4.txt Two 96 well plates with 4 controls in column 12
accs384x2controls8.txt Two 384 well plates with 8 controls in column 24
accs1536x2controls16x2.txt Two 1536 well plates with 16 controls, in duplicate, in columns 47, 48

Architecture

LIMS*Nucleus is amenable to a variety of installation configurations:

Example Client Server 1 Server 2
Data Center Web Browser Application Server Database Server
AWS/EC2 Web Browser Application & Database Server
Personal laptop Browser, Application & Database Server

Most of the LIMS*Nucleus business logic is implemented using Postgres stored procedures. The client utililizes Bootstrap/Datatables to guide/validate user input, and display results in table format.

LIMS*Nucleus Client Installation

The LIMS*Nucleus client is distributed and installed as a Guix Package. The name of the LIMS*Nucleus package is ‘limsn’. For the package to be available to your system, you must first modify your channels.scm file to include the labsolns channel. You can then issue the install command:

1
guix package -i limsn

This will install not only LIMS*Nucleus but also all of its dependencies, as well as configuration scripts and sql scripts for setting up the database. You may have already set up the database in which case you only need to configure artanis.conf. The sequence of scripts that need to be run are:

Sequence Script Name Function
1 init-limsn.sh create directories that hold temp files and the configuration file; modify .bashrc
2 install-pg-aws.sh install the Postgres database; install-pg-aws.sh is designed for AWS, there are other options
3 start-limsn.sh start the client; run in background mode if desired with ‘nohup’

Other options, such as the AWS installation script will automatically run the init-limsn.sh and install-pg-aws.sh scripts for you.

Configuration

Configuration of LIMS*Nucleus is achieved by editing either /etc/artanis/artanis.conf or $HOME/.config/limsn/artanis.conf, depending on how LIMS*Nucleus was installed. LIMS*Nucleus specific parameters are listed below:

Database

These parameter will need to be edited if you utilize a cloud provider. These are the parameters that comprise the connection string. PostgreSQL is the only database with which LIMS*Nucleus is compatible.

Parameter Description Default
db.addr database address:port 127.0.0.1:5432
db.username database username ln_admin
db.passwd database password welcome
db.name database name lndb

Web Server

Parameter Description Default
host.addr Host address - the web server 127.0.0.1
host.port web server port 3000

LIMS*Nucleus specific

Parameter Description Default
cookie.expires Cookie expiration time in seconds; Expiration of the session cookie will require a user to re-login 21600
cookie.maxplates* Maximum number of plates per plate set; Modifications ignored unless registered 10
  • Note that the ‘maxplates’ parameter is in the cookie group only for convenience. A maxplates cookie is never set. The only cookie utilized by LIMS*Nucleus is the session id ‘sid’.