Obtain a registration key
Please read terms of the license.
Obtain a registration key so you can modify the configuration parameter ‘maxnumplates’.
Please read terms of the license.
Obtain a registration key so you can modify the configuration parameter ‘maxnumplates’.
| Registration ID: | ||
| Registration Key: |
Log in to LIMS*Nucleus as an administrator and enter the above values under Utilities/Register
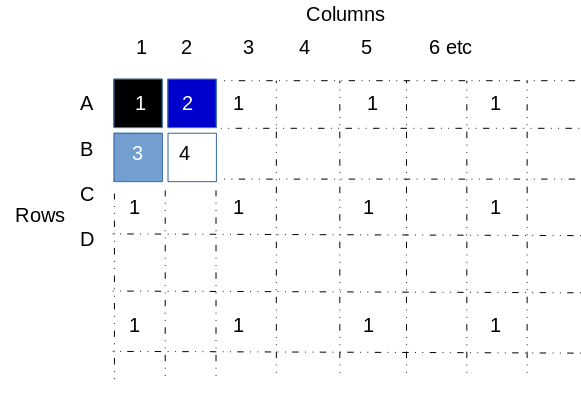
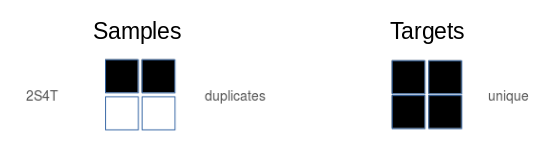
LIMS*Nucleus handles five combinations of replication for samples and targets. In the table below, the pattern columns show the distribution of samples and target in the four quadrants of a 384 or 1536 well plate, where each color represents a unique sample (or target).
| Label | Sample pattern | Sample replication | Target Pattern | Target replication | N targets | N rep (Assay) |
|---|---|---|---|---|---|---|
| 1S4T |  |
unique |  |
quadruplicates | 1 | 1 |
| 2S2T |  |
duplicates |  |
duplicates | 2 | 1 |
| 2S4T | |
duplicates | |
quadruplicates | 1 | 2 |
| 4S1T | |
quadruplicates | |
unique | 4 | 1 |
| 4S2T | |
quadruplicates | |
duplicates | 2 | 2 |
As an example consider an assay of eight 96 well plates that will be reformatted into 384 well plates for assay:
1S4T: Eight 96 plates will be reformatted into two 384 well plates (Four 96 per 384) with a unique plate in each quadrant. The 384 plates is coated with the same target in all four quadrants. There is only one target (N Targets) and each sample gets assayed 1 time (N rep (Assay))
2S2T: Eight 96 well plates will be reformatted into four 384 well plates (two 96 per 384) with one sample plate replicated in quads 1,2 and a second replicated in quads 3,4. The 384 well plates are coated with 2 antigens, antigen A in all odd columns and antigen B in all even columns. There are two targets (antigens A and B - N targets) and each sample is assayed once on each target, (N rep (Assay)). Because there are twice as many antigens being assayed as in the example above, twice as many plates are needed.
4S2T: Eight 96 well plates will be reformatted into eight 384 well plates (one 96 per 384) with one sample plate replicated in all four quadrants. The 384 well plates are coated with 2 antigens, antigen A in all odd columns and antigen B in all even columns. There are two targets (antigens A and B - N targets) and each sample is assayed twice on each target, (N rep (Assay)).
For example these are not an option.
| Label | Sample pattern | Sample replication | Target Pattern | Target replication | N targets | N rep (Assay) |
|---|---|---|---|---|---|---|
| 1S2T | |
unique | |
duplicates | 2 | 1 |
| 1S1T | |
unique | |
unique | 4 | 1 |
1S2T: Half the source plates are tested on one antigen, the other half on a different antigen. This is better broken into 2 assays, one assay per antigen, or 2 X [ 1S4T ]
1S1T: Convert to 4 X [ 1S4T ], one assay per antigen.
Samples are always replicated horizontally ( quads 1,2 and 3,4) Targets are always replicated vertically ( quads 1,3 and 2,4)
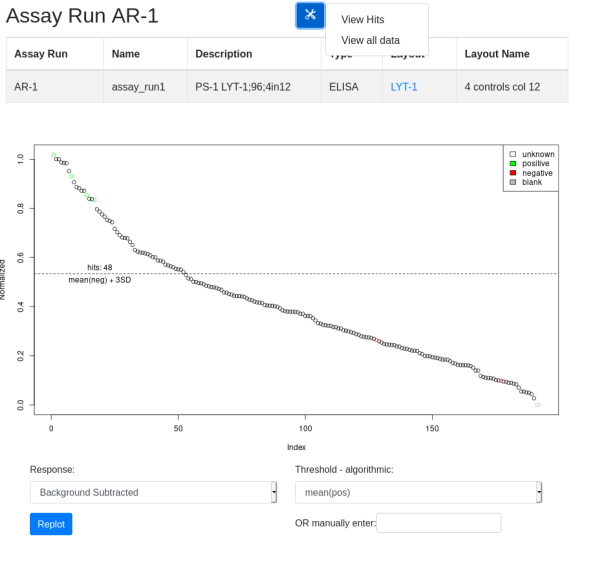
In the plot view you are given the option to replot data using different normalizations and thresholds. In any view hits are calculated based on the selected parameters. These hits can be viewed by selecting the tool icon ‘View Hits’ option. In the hits view a hit list can be registered. The ‘View All Data’ option provides a table of all the underlying annotated data for export. External software can then be used to analyze the data and generate hit lists:
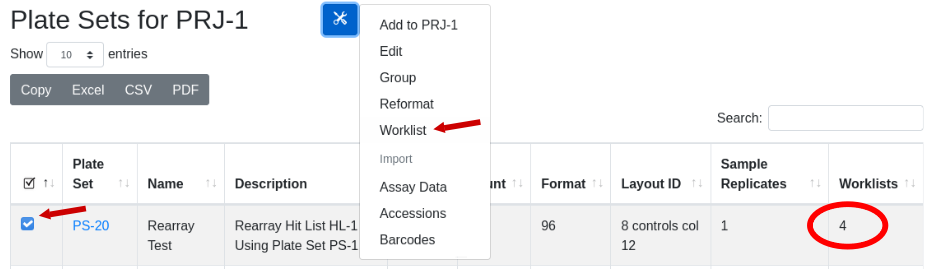
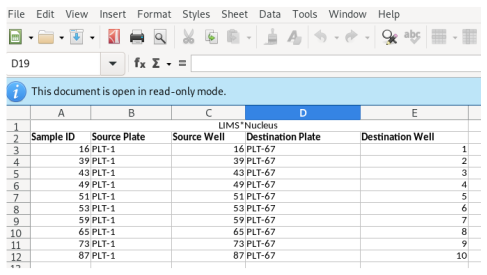
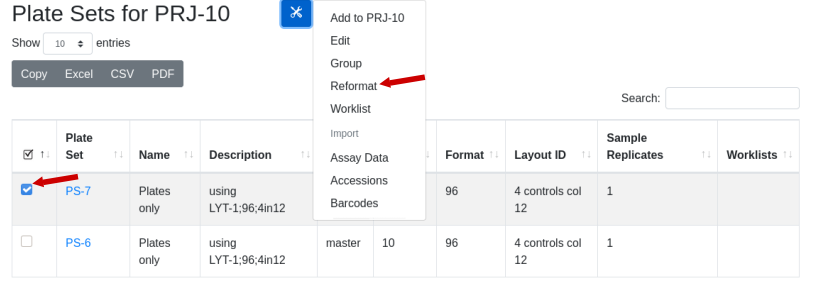
When a rearray workflow is executed, automatically a robot worklist suitable for executing the physical rearraying of samples is generated. That worklist is stored, and its existance is indicated in the “Worklist” column in the Plate Set view. With the plate set containing a worklist of interest selected, under the tools icon select the menu item ‘worklist’:
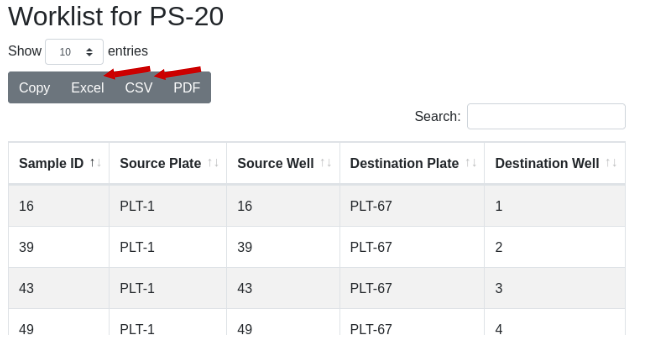
The worklist will be displayed. Use the export buttons to select the desired export format:
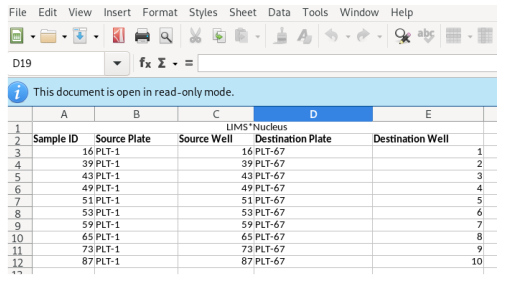
The worklist will be generated and transferred to your spreadsheet application:
When reformatting 96 well plates into 384 with fixed tip 96 channel liquid handling robot, the layouts of the destination plate is predetermined and matches the source layout, only replicated four times. Each source plate is deposited into a “quadrant” of the destination plate, such that a quadrant is defined as the wells across the destination plate that accomodate the samples from one source plate.
In the image below, quadrants are indicated for wells A01, A02, B01, and B02. Additional wells that belong to quadrant 1 are indicated. Note that quadrant 1 wells extend across the 384 well plate down to well O23.
The following images explicitly define the indicated quadrant with a filled in square:


A simplifying assumption made by LIMS*Nucleus is that during a reformatting operation, source plates are added sequentialy in a Z pattern such that plate 1 is deposited into quadrant 1, plate 2 into quadrant 2, etc.:
The process of transferring four 384 well plates into a 1536 well plate is analogous to what is described above.
Rearraying is the process of transferring hits from one or more plates into a new plate set. Hits are transferred in sample id order, into plates by column. In the example below, hits are the black wells across 3 plates, being transferred into a single plate:

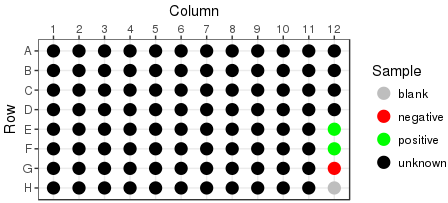
To initiate a rearray operation start by navigating into a hit list by clicking on the hit list URL. Scroll down to see the list of plate sets that contain the hits of interest. Here I am looking at HL-1:
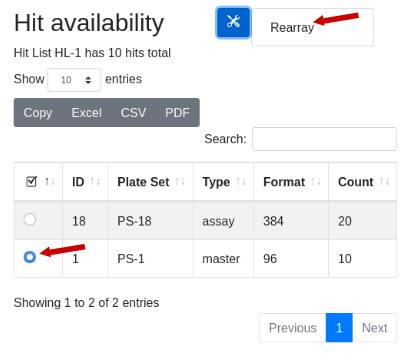
Note there are 10 hits total. Two plate sets are suggested, but the 384 well plate set is a transient assay plate that contains the hits in duplicate. Use the plate type as a guicde as to which plates might contain the samples. The master plate set PS-1 is selected. Under the tools icon select ‘Rearray’:
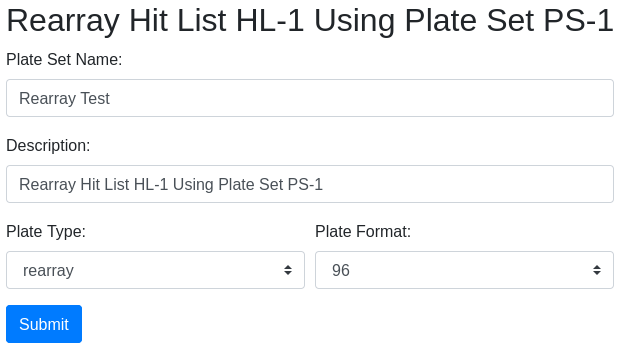
The rearray form will appear, with an auto-generated description which you can edit. Fill in the required information and click ‘Submit’.
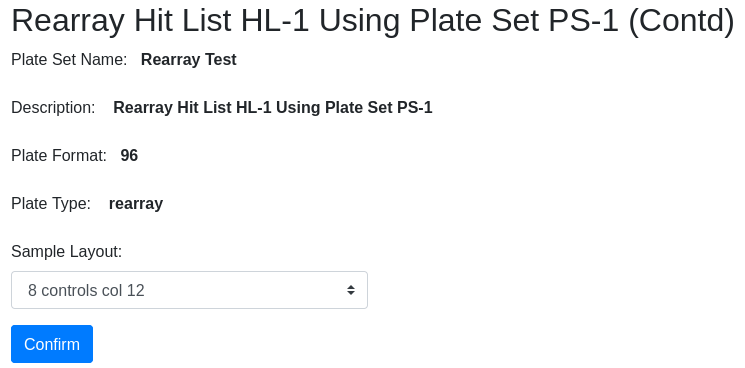
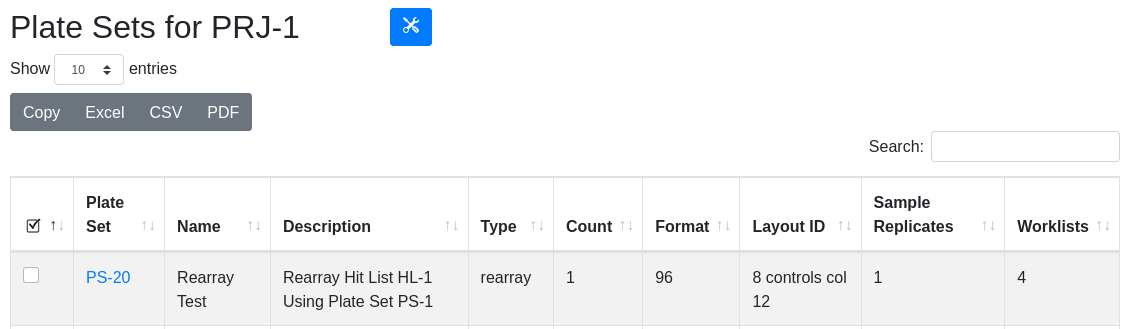
Confirm the information and select the controls layout. You are then directed to the plate set page where you can see the new plate set PS-20 of hits:
| Field | Description |
|---|---|
| Name | freeform text, a descriptive name |
| Description | auto-populated but editable |
| Format | 96, 384 well plates are possible destination formats |
| Type | Rearray suggested but user selected |
| Sample Layout | Choose a layout; layout “description” appears in this dropdown |
In the plate set view, the newly created PS-20 in PRJ-1 is visible with its informative description. There is also a worklist associated with the plate set because it was created using a rearray operation.
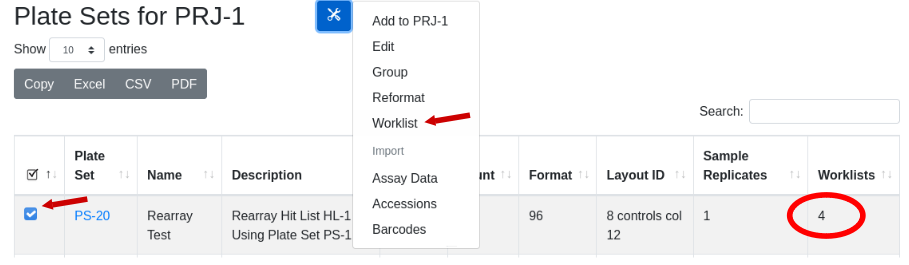
Generate a view of the worklist:
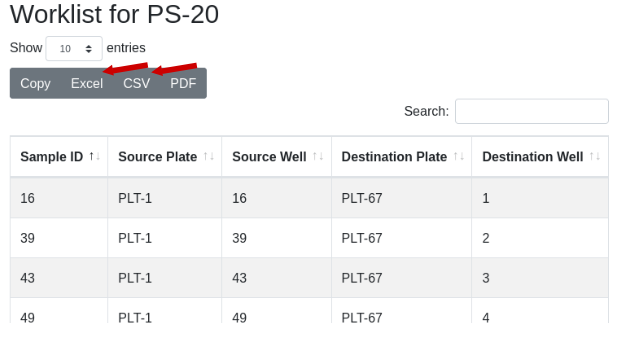
Now to physically transfer the samples from PS-1 to the new plates of PS-20, export the worklist to Excel and import into a liquid handling robot to run the transfer:
Reformat is an operation performed on plate sets. Reformat will collapse four 96 well plates into a single 384 well, providing 1 replicate per sample. It is also possible to generate duplicates or quadruplicates of each sample. The plate layout of a reformatted destination plate is predetermined by the layout of the source plate, with some examples shown below. Source plates are loaded into destination plates in plate set order, following the Z pattern through the quadrants.
| 96 well source plate | 384 well destination plate |
|---|---|
 |
Singlecates |
Duplicates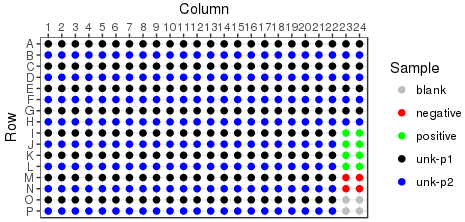 |
|
Quadruplicates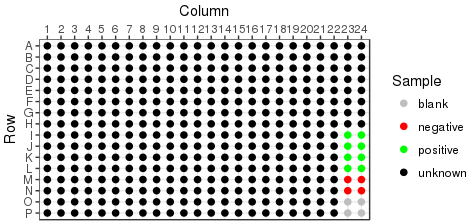 |
The same patterns apply when reformatting 384 well plates into 1536
Read the reformat overview

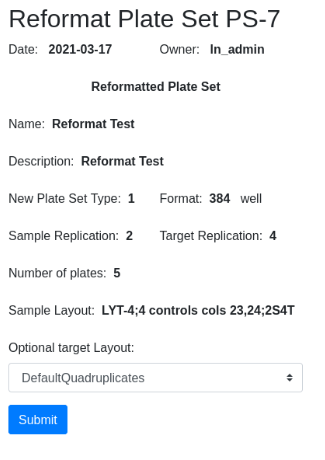
Confirm and select target layout if applicable. Note that the destination layout is selected for you, LYT-4. The destination layout is predetermined by the source layout and the level of sample and target replication (see below):
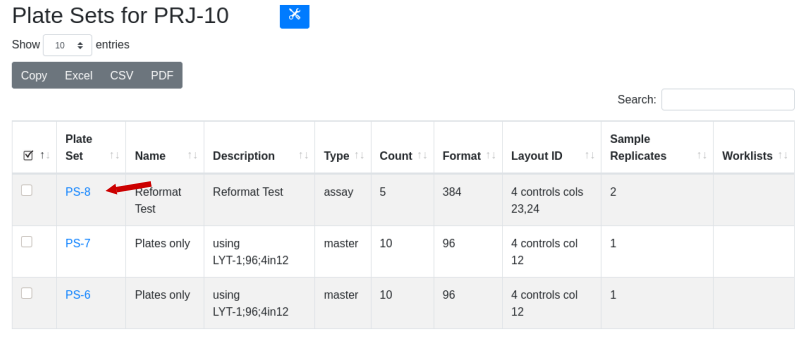
The new plate set, PS-8, is available in the plate set list:
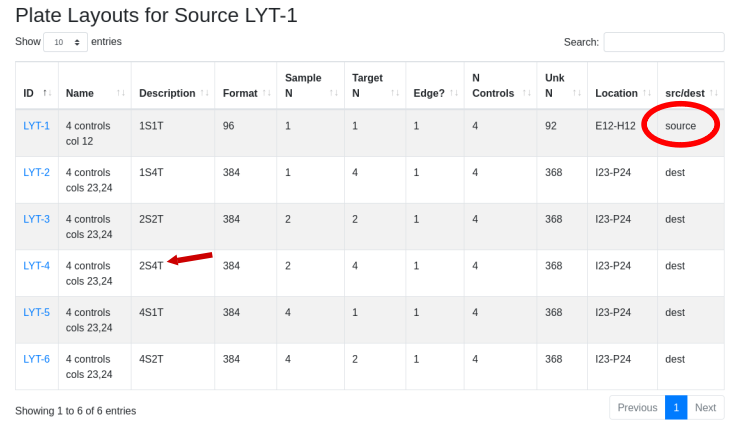
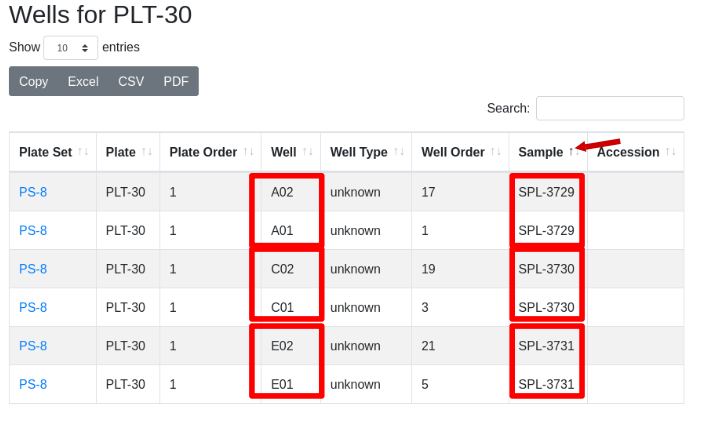
Drill down to see that there are five 384 well plates. The original plate set contained 10 96 well plates in LYT-1 that were reformatted in duplicate using LYT-4. Use the global menu to select plate layouts and drill down into LYT-1 to identify the potential destination layouts for LYT-1. LYT-4 is one option for duplicate samples, with the target being the same across the plate (4T - same target in all 4 quadrants).
This requires ten 384 well plates with the duplicate samples side-by-side using the replication pattern 2S4T:
To confirm the samples are in this format, drill down to wells/samples and sort the samples by clicking on the “Sample” column header. Confirm that the two replicates of each sample are in neighboring wells e.g. A01, A02, and C01, C02 etc.
A Guix pack installation is a simple installation suitable for users not interested in the Guix package manager. The detailed instructions below follow the same process automated by the install script found on the evaluate page, but provides additional diagnostic information.
The first step in the install script is setting up the database. Manually install the database using instructions on the postgres page.
If you are using the install script and it is not executable, change permissions:
1 | chmod 777 install-limsn-pack.sh |
1 | wget https://github.com/limsn/labsolns/releases/download/v0.1.0p/limsn-0.1.0-pack.tar.gz |
Look at the contents of the bin directory
1 | $ls ./bin |
Various *limsn*.sh scripts are needed to configure and start up LIMS*Nucleus. You can also use psql to diagnose the database.
1 | $export PATH="$HOME/bin${PATH:+:}$PATH" |
Note that in the above example I am using the admin account on AWS so $HOME == /home/admin
Initialize by executing ./bin/init-limsn-pack.sh. The function of the various scripts is described on the scripts page. Check that the $HOME/.config/limsn directory has been created and artanis.conf has been copied into the directory:
1 | $ ls $HOME/.config/limsn |
Check that $HOME/.bashrc has been modified to include exports for LC_ALL, PATH, GUILE_LOAD_PATH, and GUILE_DBD_PATH.
1 | ... |
source .bashrc to make certain that all environment variables have been properly set:
1 | $source $HOME/.bashrc |
Critical parameters are described on the configuration page. You must have in hand IP addresses for the database and client.
1 | sudo nano $HOME/.config/limsn/artanis.conf |
The psql command below will work on a local database - modify accordingly. You should find 10 preloaded projects. Projects 4-9 are empty and can be used for experimentation:
1 | $psql -U ln_admin -h 127.0.0.1 lndb |
Start in detached mode so you can close the terminal. To kill the process you will need to look up the PID and kill. Start in regular mode to monitor any error messages.
1 | $nohup start-limsn.sh & |
to kill Ctrl-C in interactive mode or in detached mode:
1 | $ ps aux | grep artanis |