Using the demonstration data, work through a cononical workflow. This tutorial is available as a video
Create a new plate set by reformating
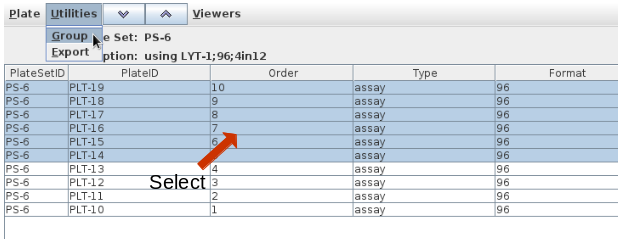
Using the demonstration data, reformat Project 10, Plate Set 6, 10 96 well plates, into 384 well assay plates with a replication of 1. Navigate into Project 10 and select plate set 6:
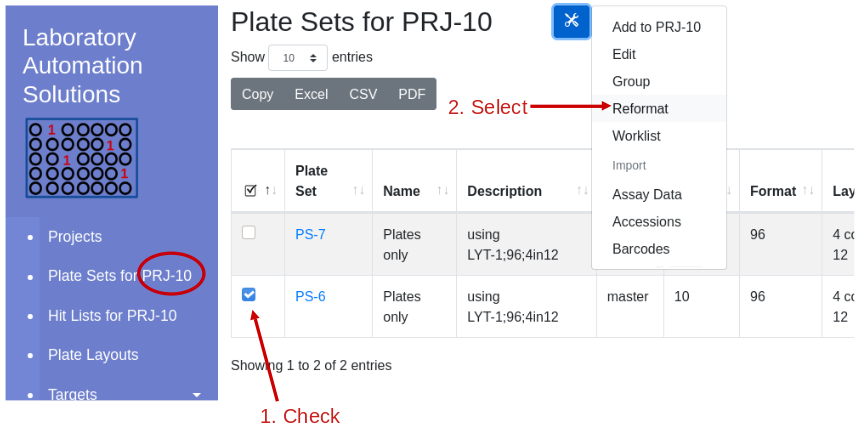
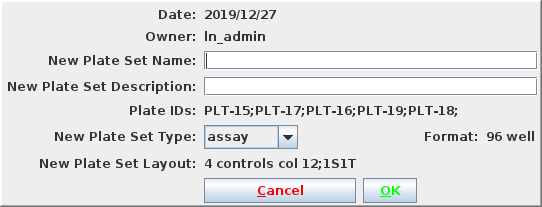
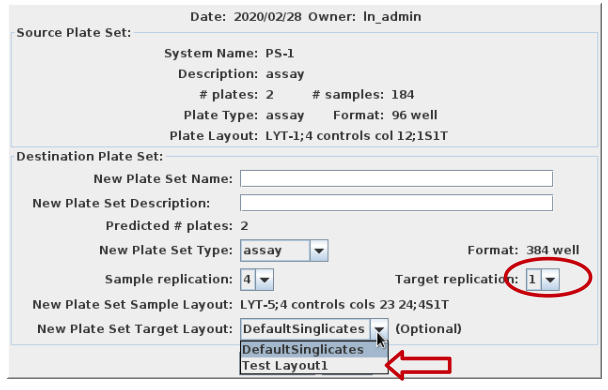
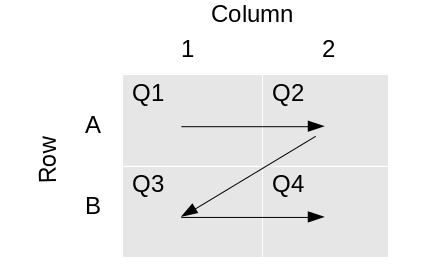
Select reformat to be presented with the reformat form. The top panel provides information about the source plate set, and the bottom panels requests information on the design of the destination plate set. I will use sample replicates of 1 and target replicates of 4 i.e. all 4 quadrants of the 384 well plate coated with the same target. This requires that I define the layout as 1S4T.
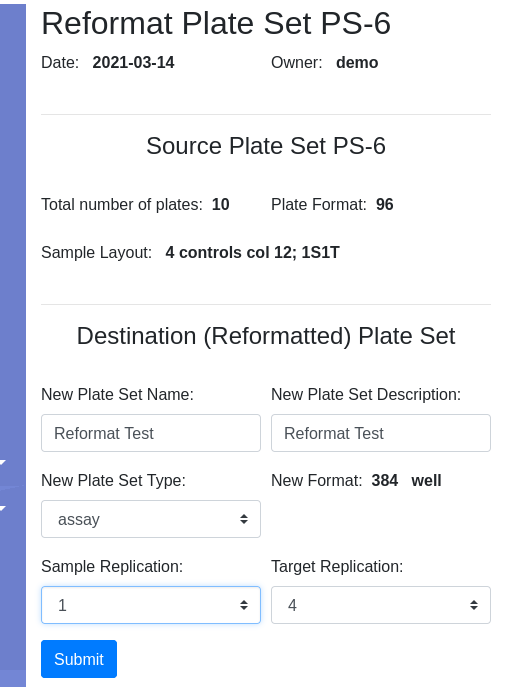
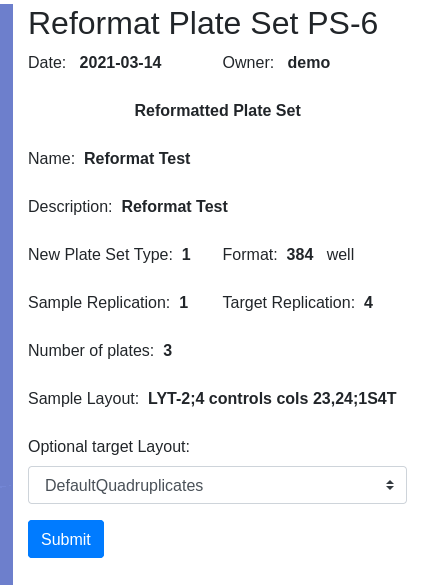
Pressing Submit brings you to the confirmation page where you have the opportunity to select the target layout. I will get a new Plate Set #8, assuming no earlier modifications were made to the demo data. Navigate into PS-8 and note that there are 3 plates, 30-32, with 32 only half filled. I am ready to load data.
Apply barcode IDs to plates, Accession IDs to samples
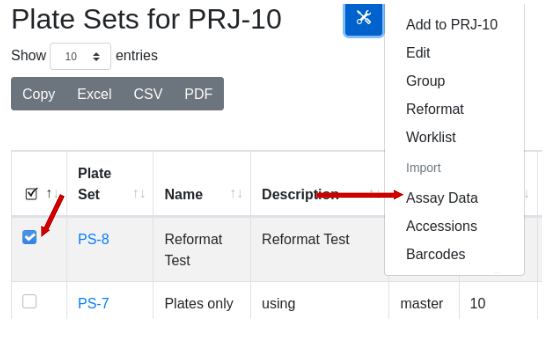
Applying barcode and accession IDs is optional. The purpose of these identifiers is to allow you to associate LIMS*Nucleus data with data in other systems. Start by selecting the Plate Set of interest, PS-8 in this case, and follow the directions for importing accession ids and barcode ids. Use the following data:
| ID type | File |
|---|---|
| accession | ps8-accessions.txt |
| barcode | ps8-barcodes.txt |
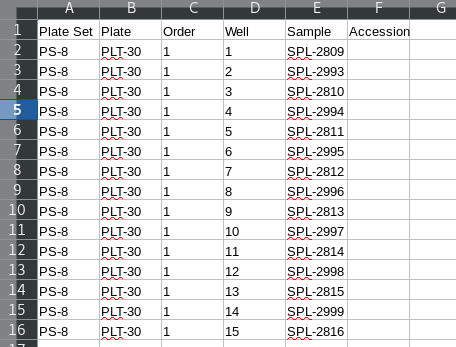
Note that empty wells in the third plate do not have an entry in the acessions file. A template for loading the accession IDs can be generated by exporting the underlying plate set data. The columns of interest are “Order” and “Well” which must be relabeled “plate” and “well”. Also include the accession as “accs.id”.
Load assay data.
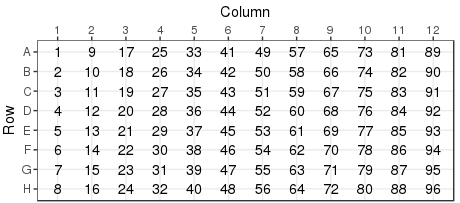
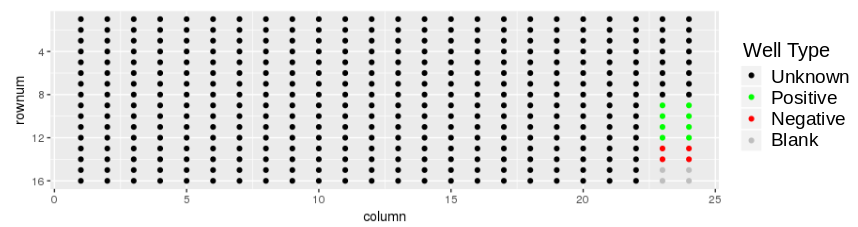
Download the demonstration tab delimitted data set plates384x3_1S4T.txt to your local drive. The plate layout looks like:
and the response values look like:
This might be an ELISA assay showing a majority of responses less than 0.5. There is good reproducibility amongst the controls, with a good assay window. With the destination plate set highlighted, select Utilities/Import assay data:
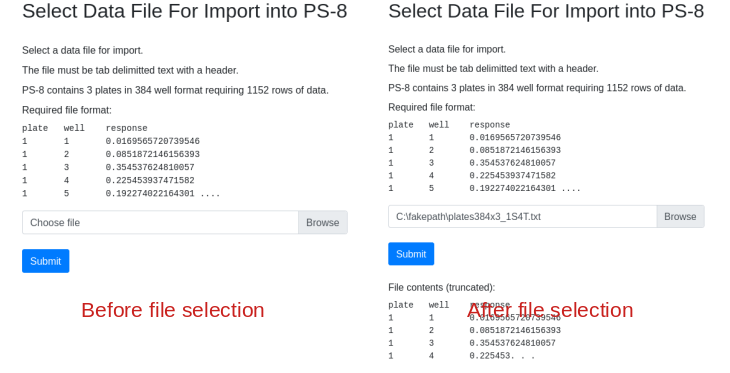
Fill in the dialog, substituting the path name with the path to the file on your computer. Note that the import form provides a sample of what the import data should look like. Column order, spelling and capitalization are critical. After file selection the first few rows of data are displayed for confirmation:
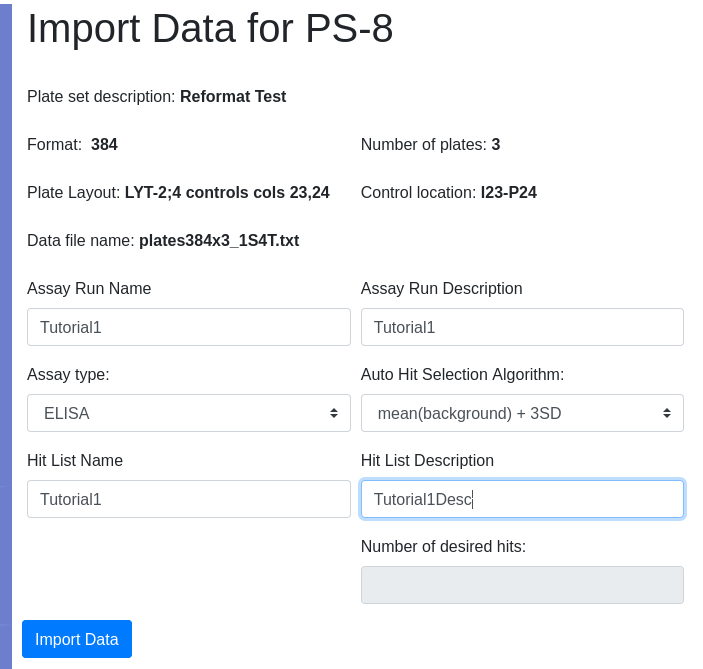
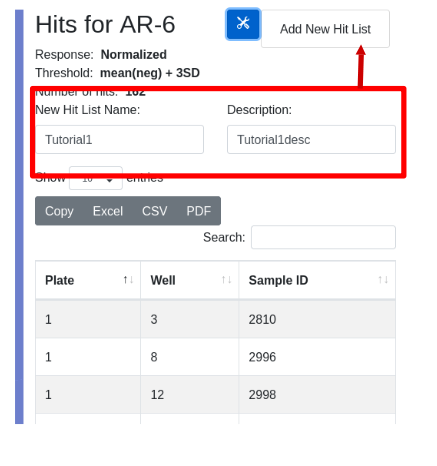
I want hits automatically identified using a built in algorithm so I select the option mean +3SD in the algorithm dropdown so that all responses greater than the mean of the background wells + 3 standard deviation units are considered a hit. Because I am auto-identifiying hits, the add hit list name and description fields become active giving me the opportunity to name and describe the hit list. I did NOT select Top N as the selection algorithm so the number of desired hits field remains inactive:
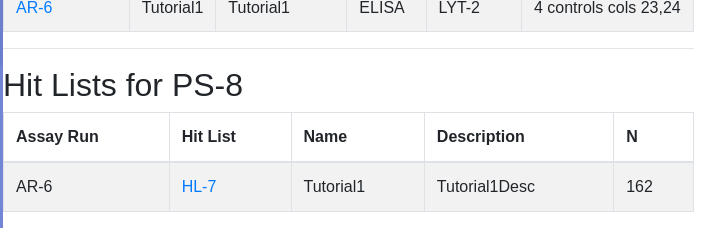
Click import data. Not that the import button changes to ‘Loading…’. Do not reclick. Depending on the size of the data, import could take many seconds. Once complete you will be presented with the list of plates for the current plate set. Scroll down to see assaciated hit lists - HL-7 being the just created hit list:
View the Assay Run
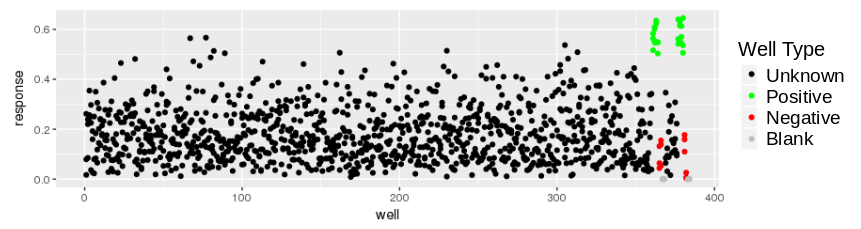
Click on the assay run hyperlink AR-6, to view the data under default conditions - normalized with a threshold of mean of the negative controls plus 3 standard deviations. Controls are color coded:
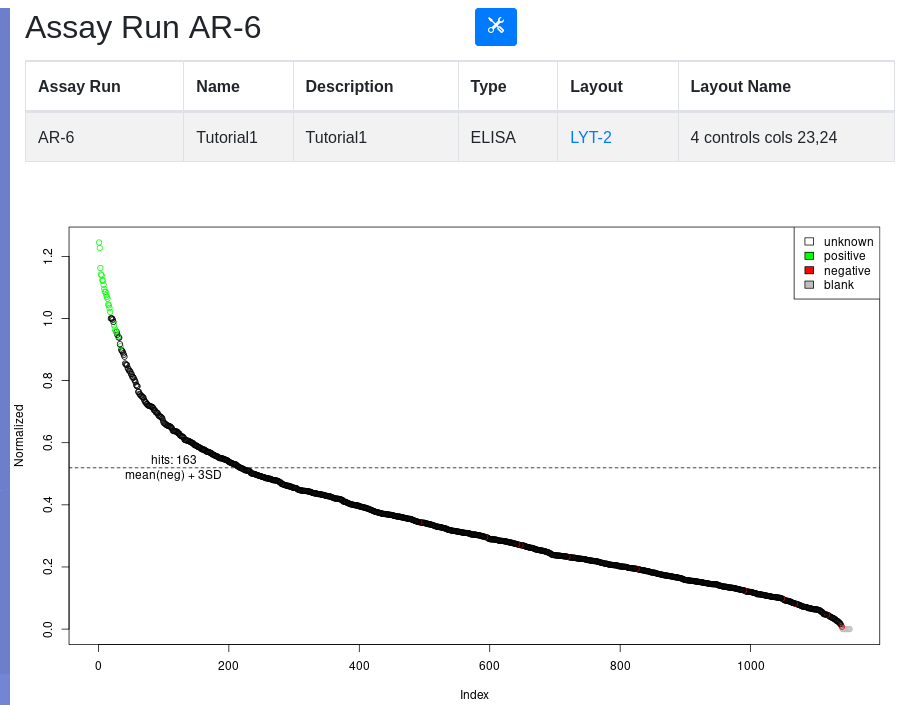
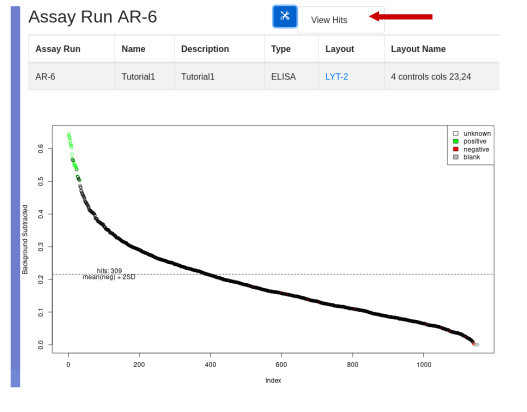
Below the plot is a form for replotting under different conditions of normalization and thresholding. After replot, the tools menu allows for the viewing of hits above the selected threshold and the creation of a hit list if desired.
View the Hit List
To view a hit list, select the menu item under the tools icon. In the hit list view you can inspect the hits and are given the opportunity to save the list. Enter and name and description, and select ‘Add New Hit List’ from the tools menu:
Upon successful creation of the hit list you are presented with its parent assay run. Scroll to the bottom to see the newly created hit list:

Rearray
At this point you are ready to rearry your hits into a new plate set for secondary assay or further processing. Note that HL-7 contains 162 samples. Click on the ‘HL-7’ hyperlink to view the hit list. Scroll to the bottom to see the availability of hits in various plate sets:
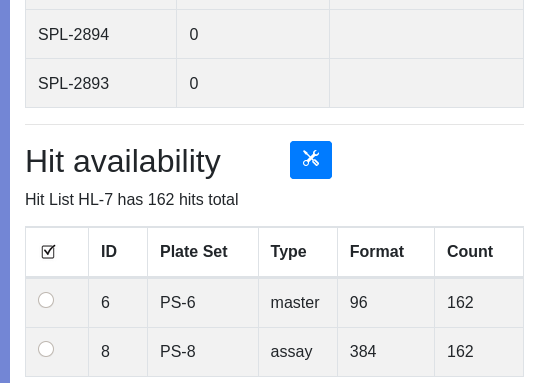
In our simplistic demonstration data set, it is obvious that the parental samples for our assay plate set are in plate set 6. In real life processing, samples may get distributed across many plate sets. Use the type and count fields to help determine an appropriate source of samples for rearray. Assay plates are typically transient and not a source of material for rearraying. You must establish type naming conventions for your plate set, for example archive plates or master/daughter/rearry plates contain samples while assay plates are transient. In the demo data PS-6 is labeled “master”, which helps identify a plate that contains the parent samples. Assay plates are typically transient and not a source for sample recovery.
The count field is to confirm that a particular plate set contains (or not) all the hits of interest. If no single plate set contains all hits, you may have to group plate sets.
Select the plate set that will serve as the rearry source and select “Rearry” using the tools button. This will initiate the production of a new plate set that will contain hits only:
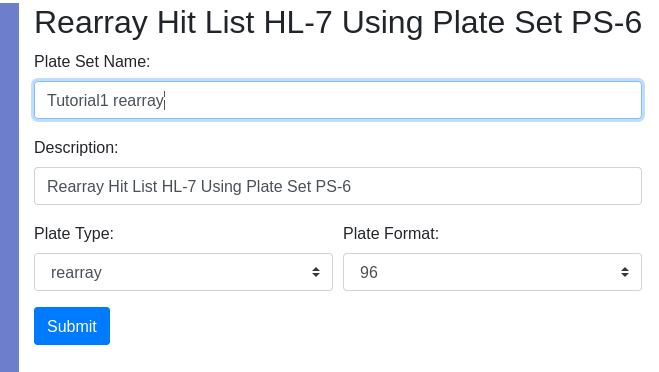
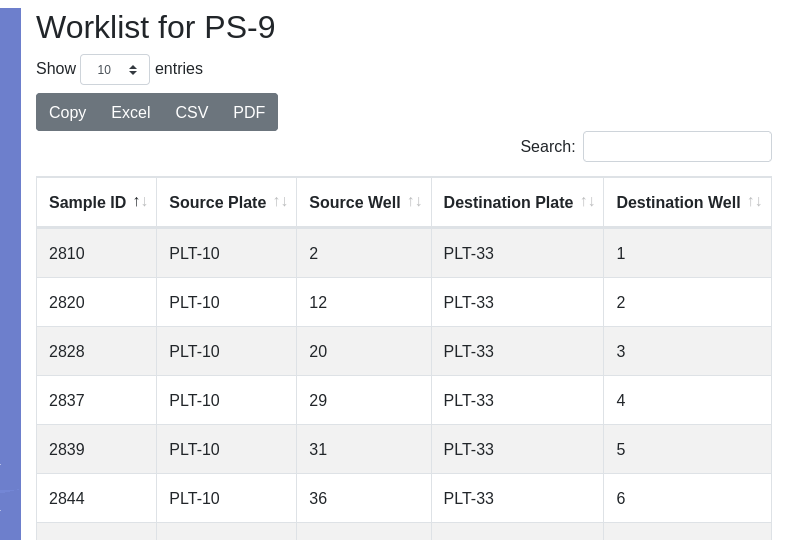
Provide the requested information and press “Submit”. You will then have the opportunity to select the layout of controls. The number of plates required will be automatically calculated and hits will be distributed in numerical order by column into the plates. Since this is a rearray plate, and not an assay plate, the target is auto-assigned to DefaultQuadruplicates, which is inconsequential. To achieve the physical rearry in the lab a worklist is generated and associated with the plate set. Indication that a plate set was generated by a worklist is the presence of the worklist ID in the “worklist” column in the plate set view. Only plate sets generated by a rearray have an integer in the “worklist” column. The worklist is permanently stored in the database and can be recalled by selecting the plate set and using the tools icon select ‘Worklist’.

The worklist will be displayed:
The worklist can be exported to e.g. Microsoft Excel or LibreOffice Calc, depending on what your computer has associated with the .CSV extension:
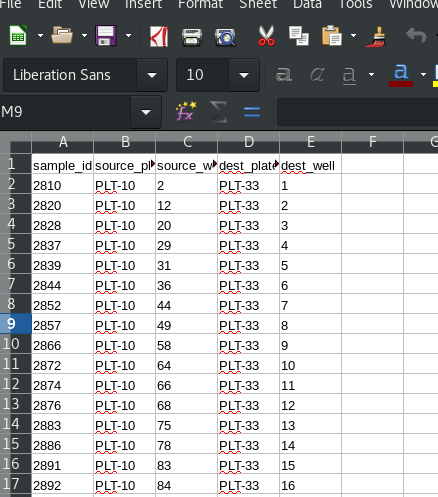
This worklist can be used with a liquid handling robot such as a Beckman Biomek, to perform the physical rearry.
Tutorial 2 is a repeat of the canonical workflow, this time using an assay plate layout that allows for duplicate samples.